Activating MySQL
The basic PHP software consists of a core set of functionality and optional extensions that provide additional functionality. MySQL support is provided by extensions. In PHP 4, MySQL support is provided by default, but beginning with PHP 5.0, MySQL support must be activated before PHP can interact with MySQL databases.
PHP provides two extensions for MySQL support--the mysql extension and the mysqli (MySQL Improved) extension. Which extension you need to activate depends on which version of PHP and MySQL you are using. The mysql extension, available with PHP 4, 5, and 6. provides functions for interacting with MySQL version 4.0 and earlier. The mysqli extension, added in PHP 5, provides functions for interacting with MySQL version 4.1 and later. The mysql functions can also be used with the later versions of MySQL, but they cannot access some of the new features added in the later versions of MySQL.
Activating MySQL Support on Linux and MacActivating MySQL Support on Windows
Activating MySQL Support on Linux and Mac
MySQL support is activated during PHP installation on Linux and Mac with installation options. The installation options to activate MySQL must be used during installation (Step 4) to activate MySQL support. MySQL support cannot be added later, after PHP is compiled and installed.
Use one of the following installation options:
   --with-mysqli=DIR
   --with-mysql=DIR
DIR is the path to the appropriate MySQL directory. When using with-mysqli, use the path to the file named mysql_config. When using with-mysql, use the path to the directory where mysql is installed, such as:
--with-mysql=/user/local/mysql
Activating MySQL Support on Windows
You activate MySQL by configuring extension lines in the php.ini file, after PHP is installed. In addition, you must place the files that the extension needs in a location where PHP can find the files.
Configuring PHP for MySQL Support
To configure PHP for MySQL support, perform the following steps:
- Open the php.ini file for editing.
- Find the list of extensions.
- Find the line for the MySQL extension that you want to use, such as:
;extension=php_mysqli.dll
- Remove the semicolon at the beginning of the line. If a line does not exist for the MySQL extension that you want to use, add the line.
- Save the php.ini file.
- Restart your Web server.
Setting up the MySQL Support Files
To provide MySQL support, PHP requires access to two files--php_mysqli.dll and libmysql.dll. You need to place these files in a folder that is in your system path so that PHP can access them.You can check your current system path by opening a Command Prompt Window (Start->Programs->Accessories->Command Prompt) and typing: path. The path is displayed. However, this is the path that will go into effect when you next start your computer. Therefore, if you have changed your path during the current session, this path will not be the active path until you restart your computer.
The best way to make the MySQL support files available is to add the main PHP directory, to your system path and then copy the files into the main directory.
Setting Your System Path
You can add the main PHP directory, such as c:\php, to your path, as follows:
- Go to the Control Panel. For instance, Start->Control Panel.
- Click System.
- Click the Advanced Tab.
- Click Environment Variables.
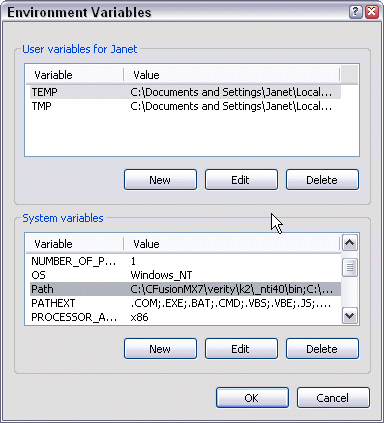
The Environment Variables window, shown in Figure 2-2, opens.
- Click Path in the System Variables pane. You may need to scroll down to find the line for the Path variable.
- Click Edit.
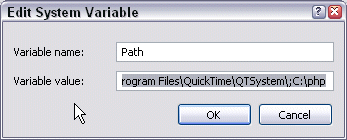
The Edit System Variable window, shown in Figure 2-3, opens.

Figure 2-3: Edit System Variable window
- Add a semicolon to the end of the existing system path, followed by the
path to the main PHP directory, such as ;c:\php.
Warning: Be sure you do not delete anything in your current path. Just add the PHP directory to the end of the path.
- Click OK.
- Restart your computer.

Figure 2-2: Environment Variables
Moving the necessary files
Once the main PHP directory is included in your system path, copy the required files into the main directory. The extension files are located in the ext subdirectory. Copy one of the following files, depending on which version of MySQL you’re using:
   ext\php_mysqli.dll (for MySQL 4.1 or later)
   ext\php_mysql.dll (for MySQL 4.0 or earlier)
Copy the file into the main PHP directory, such as c:\php.
The second required file, named libmysql.dll, should already be located in the main PHP directory. If it isn't, you need to find it and copy it there. If it’s not in your PHP directory, it’s usually installed with MySQL, so find it in the directory where MySQL was installed, perhaps in a bin subdirectory, such as c:\Program Files\MySQL\MySQL Server 5.0\bin.
You can copy the files into a directory that is already in your system path, such as c:\windows or c:\windows\system32, rather than changing your system path to include the main PHP directory and copying the files to the main directory as described in this section. However, although this method is simpler, with fewer steps, it can lead to problems when you upgrade PHP in the future. The .dll files for all versions have the same name. If you keep the files in the main PHP directory for the current version, rather than copying them into a common directory, you can just replace the entire main directory with the new version. There is no opportunity to mix up the .dll files for different versions.
Checking MySQL Support
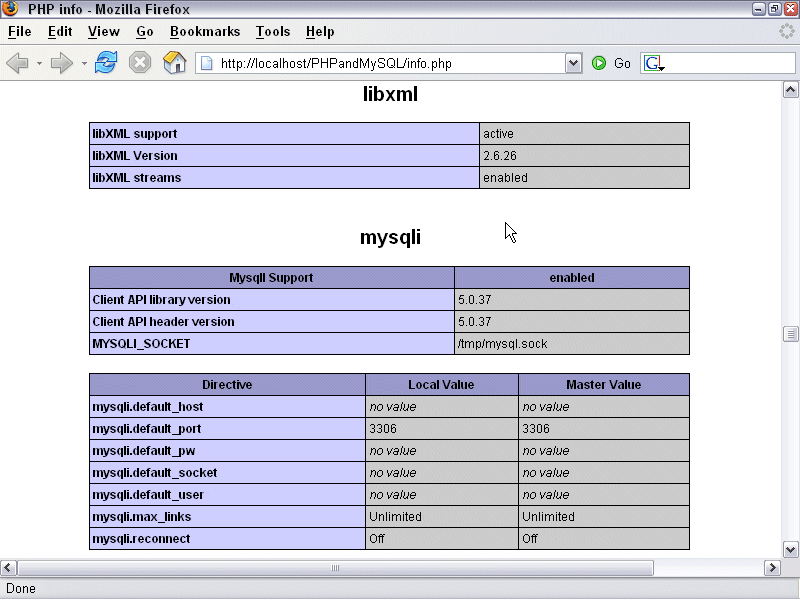
To check that MySQL is activated, run the test.php script as described in Testing PHP. The output should include a section showing MySQL settings, as shown in Figure 2-4. If a MySQL section doesn't appear in the output, see Troubleshooting.

Figure 2-4: MySQL settings